Congratulations to Eunice Robison and Michelle Wulf!

Friday, May 17, 2013
Pattern giveaway winners!
We had a small turnout for the giveaway...so small, in fact, that everyone who entered won!
Monday, May 13, 2013
Let's give a pattern away!
Giveaway is closed!
That's right, friends, we finally have our new baby sun visor pattern ready and up for sale (4 sizes included) on Etsy, Craftsy and Ravelry!

Photo by Cindy White Photography
We first published this pattern on Craftsy last year as a free download with only the 0-3 month size. It was so popular--more than 350 have now been downloaded!--that we decided to expand the number of sizes available and publish it as a full pattern. We have it listed for a special intro price on all three sites mentioned, but this week, you have a chance to get it for an even better price...free! Yep, we're going to give a copy of this pattern away to 4 lucky winners! You know we like to keep things simple around here, so here's what you do to enter:

1. Comment on this blog post with how you'll use the pattern if you win it.
2. That's all!!

Photo by Joyce Pinto Photographie
We would, of course, love it if you would share this post with your friends. :)
Contest will run now through Friday evening, May 17, at 9:00 p.m. Eastern time. We'll select the 4 winners via random.com.
Wednesday, October 31, 2012
For the Crocheter...the Magic Circle
The magic circle is an amazing technique that you can use to begin anything you crochet that is in the shape of, well, a circle! It is also known as a magic ring, an adjustable loop, or any combination of these terms. I love the way a hat looks when I use this to begin. I hope that this brief tutorial will help you learn how to make it. If you need more help, feel free to contact us!
In this example, I'm going to show you how to make a magic circle with 10 single crochets. Normally, you'll see it used with single crochet, double crochet and half-double crochet.


In this example, I'm going to show you how to make a magic circle with 10 single crochets. Normally, you'll see it used with single crochet, double crochet and half-double crochet.
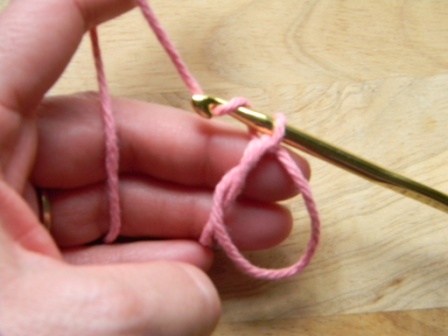
First, you make a circle by putting the yarn tail behind the working yarn (coming out of the skein). At first, until you master this technique, you'll want to leave a longer tail, probably 5"-6". Once you have it down, you'll be able to shorten that length.

Next, use your hook to pull a loop through the circle.

Chain 1.

Now you begin your single crochets. The hook goes through the circle (as in the first photo), you pull your loop up around the circle and the tail, and make your single crochet.

Continue crocheting until you have the required number of stitches. Be sure that each stitch goes around the circle and the yarn tail.

Now, I realize that I didn't take this picture correctly! What you need to do at this point is remove your hook and make the loop from the hook bigger, just so that it doesn't pull out. Then you're going to hold the circle in one hand and gently, but firmly, pull on the tail until the circle tightens...

...and looks like this! Insert hook back into loop and continue crocheting. Do be careful when tightening the circle as some yarns, such as handspun and rovings, can break fairly easily. I even had cotton yarn break once.

You will need to fasten off the tail so that it doesn't pull out; you can do that after you crochet a couple of rounds, or like me, just wait until you finish and do all of the fastening off at the same time.
If it's awkward at first...no, check that. It probably will be awkward at first, but I encourage you to practice, and I think in no time at all, you'll wonder how you ever crocheted round stuff without the magic circle!
Sunday, October 28, 2012
For the Crocheters...the Invisible Join
Over the years, as I have learned more and more about crocheting, I have found two "secrets" that I don't know how I managed without before I learned about them. Understand that these techniques are no way, no how, original with me. If you Google them, you'll find dozens of tutorials on how to do them. I've opted to share them in our blog, not because I'm awesome with them or I'm a great hand model, but because I want to include a link in the patterns we're beginning to publish so that if people don't know how to do them, they've got an easy way to find the instructions.
The two techniques are the magic ring (aka the magic circle, the adjustable loop or any combination of these). Those instructions will come tomorrow. :) The second technique, the one I'm going to share here, is called the invisible join. I use it to finish off nearly all of the hats I make. With this technique, you make a nice, smooth join as you finish off, so that it is nearly, well, invisible!
And without further ado...the invisible join!


Pull it until it is the same size as your other stitches, and voila!...you have a nice smooth join at the base of your hat!


Happy joining!
The two techniques are the magic ring (aka the magic circle, the adjustable loop or any combination of these). Those instructions will come tomorrow. :) The second technique, the one I'm going to share here, is called the invisible join. I use it to finish off nearly all of the hats I make. With this technique, you make a nice, smooth join as you finish off, so that it is nearly, well, invisible!
And without further ado...the invisible join!
For my example, I've just finished a hat and am ready to fasten it off.

First, remove your crochet hook and leave a bit of a loop.
Cut the yarn about 3-4" from the last stitch.
Cut the yarn about 3-4" from the last stitch.

Next, pull on the loop so that the tail comes out and you don't have a loop anymore.


Now, thread a yarn needle with the tail that you have just pulled through. Insert the needle into the stitch you want to join to. (When I'm doing this on a hat, I always use the first stitch to the left of the chain that began that round. Translated: the first stitch in that last round.) Be sure to go under both loops with your needle, just as you would if you were crocheting a stitch, and pull the yarn through.


Now it gets a wee bit tricky...well, tricky to explain, at least, but hopefully easy to
understand and do! Put your needle down through the back loop of your last stitch
and pull the needle through, to the inside, until you have that nice little
v-shape that technically isn't a stitch, but looks very much like one!
understand and do! Put your needle down through the back loop of your last stitch
and pull the needle through, to the inside, until you have that nice little
v-shape that technically isn't a stitch, but looks very much like one!

Pull it until it is the same size as your other stitches, and voila!...you have a nice smooth join at the base of your hat!


Happy joining!
Friday, September 7, 2012
1500 Likes...2 Winners!
Random.org has picked the winners! And those winners are:
Joanie September 7, 2012 5:13 PM
Congrats on 1500 =0)
and
theresalucin September 7, 2012 12:24 PM
came from heavenly crochet photo props! LOVE!
Congratulations to you both! And thank you so much to everyone who stopped by. It was a spur of the moment thing, but we couldn't let this milestone pass without some kind of a thank you to our wonderful friends and fans. :)
Joanie and Theresa, send us an email (motherdaughtercreations139@gmail.com) and we'll let you know how you can redeem your $15 credit.
Thanks again, everyone!
Thursday, September 6, 2012
1500 Likes on Facebook!
Thanks to three shops that allowed us to be vendors in their giveaways, we just hit 1,500 fans on our Facebook page today! First of all, a huge thank you to Boomer Beanies, Carmen's Crocheted Creations and Heavenly Crochet Photo Props for including us! The Boomer Beanies giveaway has closed, but the other two are still going on, so head on over and check them out before it's too late.
Now. We are thrilled to have so many new friends, so we're giving two $15 credits to our Etsy shop! Yep, you read that correctly...two people will win a $15 credit to go shopping at MotherDaughter Creations! How to enter? Easy peasy! Just comment on this blog post with how you came across MotherDaughter Creations. Yes, really. That's all there is to it. :) No sharing, no liking, just a quick and easy way for us to say thanks!
Need a little incentive? Here are just a goodies we currently have available in the shop...
OK, here are the nitty gritty details for those who are, indeed, detail people. In 24 hours, at 9:00 p.m. Eastern time Friday evening, we'll use random.org to pick two people from all who comment.on this blog post. We'll post those two winners here, on the blog, and they will need to email us. They will each have a $15 credit to spend in our shop. The credit must be used by October 15.
Ready, set, comment!
Now. We are thrilled to have so many new friends, so we're giving two $15 credits to our Etsy shop! Yep, you read that correctly...two people will win a $15 credit to go shopping at MotherDaughter Creations! How to enter? Easy peasy! Just comment on this blog post with how you came across MotherDaughter Creations. Yes, really. That's all there is to it. :) No sharing, no liking, just a quick and easy way for us to say thanks!
Need a little incentive? Here are just a goodies we currently have available in the shop...
 |
| Women's slouchy beanie--OOAK |
 | ||
| Baby cowboy hat and boots--various sizes available |
 | |
| Newborn owl critter cape set--photo by www.storybookphotographybyshelly.com |
OK, here are the nitty gritty details for those who are, indeed, detail people. In 24 hours, at 9:00 p.m. Eastern time Friday evening, we'll use random.org to pick two people from all who comment.on this blog post. We'll post those two winners here, on the blog, and they will need to email us. They will each have a $15 credit to spend in our shop. The credit must be used by October 15.
Ready, set, comment!
Monday, August 27, 2012
An Extra Birthday Surprise!
As a thank you for coming to our blog to get details on the birthday celebration...an Etsy coupon code! Use coupon code TENPERCENT when you check out in our Etsy shop, and you'll get 10% off your purchase. That is in addition to the 25% off the items that are on sale and the free cotton beanie! Be sure to read the post below for the details!
NOTE: The offer for the free beanie and the coupon code are good from 8:00 p.m. Monday, August 27, through 8:00 a.m., Wednesday, August 29. (Times are U.S. Eastern.)
NOTE: The offer for the free beanie and the coupon code are good from 8:00 p.m. Monday, August 27, through 8:00 a.m., Wednesday, August 29. (Times are U.S. Eastern.)
Subscribe to:
Posts (Atom)