Wednesday, October 31, 2012

For the Crocheter...the Magic Circle

The magic circle is an amazing technique that you can use to begin anything you crochet that is in the shape of, well, a circle! It is also known as a magic ring, an adjustable loop, or any combination of these terms. I love the way a hat looks when I use this to begin. I hope that this brief tutorial will help you learn how to make it. If you need more help, feel free to contact us!

In this example, I'm going to show you how to make a magic circle with 10 single crochets. Normally, you'll see it used with single crochet, double crochet and half-double crochet. 

First, you make a circle by putting the yarn tail behind the working yarn (coming out of the skein). At first, until you master this technique, you'll want to leave a longer tail, probably 5"-6". Once you have it down, you'll be able to shorten that length. 


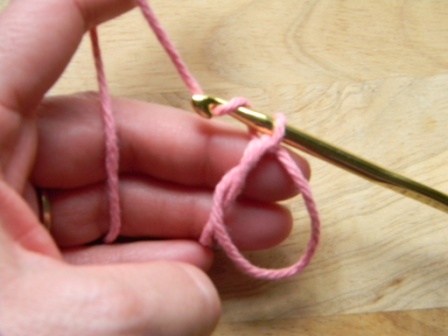
Next, use your hook to pull a loop through the circle.


Chain 1.


Now you begin your single crochets. The hook goes through the circle (as in the first photo), you pull your loop up around the circle and the tail, and make your single crochet.


Continue crocheting until you have the required number of stitches. Be sure that each stitch goes around the circle and the yarn tail.


Now, I realize that I didn't take this picture correctly! What you need to do at this point is remove your hook and make the loop from the hook bigger, just so that it doesn't pull out. Then you're going to hold the circle in one hand and gently, but firmly, pull on the tail until the circle tightens... 


...and looks like this! Insert hook back into loop and continue crocheting. Do be careful when tightening the circle as some yarns, such as handspun and rovings, can break fairly easily. I even had cotton yarn break once.


You will need to fasten off the tail so that it doesn't pull out; you can do that after you crochet a couple of rounds, or like me, just wait until you finish and do all of the fastening off at the same time.

If it's awkward at first...no, check that. It probably will be awkward at first, but I encourage you to practice, and I think in no time at all, you'll wonder how you ever crocheted round stuff without the magic circle!

Sunday, October 28, 2012

For the Crocheters...the Invisible Join

Over the years, as I have learned more and more about crocheting, I have found two "secrets" that I don't know how I managed without before I learned about them. Understand that these techniques are no way, no how, original with me. If you Google them, you'll find dozens of tutorials on how to do them. I've opted to share them in our blog, not because I'm awesome with them or I'm a great hand model, but because I want to include a link in the patterns we're beginning to publish so that if people don't know how to do them, they've got an easy way to find the instructions. 

The two techniques are the magic ring (aka the magic circle, the adjustable loop or any combination of these). Those instructions will come tomorrow. :) The second technique, the one I'm going to share here, is called the invisible join. I use it to finish off nearly all of the hats I make. With this technique, you make a nice, smooth join as you finish off, so that it is nearly, well, invisible!

And without further ado...the invisible join!

For my example, I've just finished a hat and am ready to fasten it off. 


 First, remove your crochet hook and leave a bit of a loop.
Cut the yarn about 3-4" from the last stitch.


Next, pull on the loop so that the tail comes out and you don't have a loop anymore.


Now, thread a yarn needle with the tail that you have just pulled through. Insert the needle into the stitch you want to join to. (When I'm doing this on a hat, I always use the first stitch to the left of the chain that began that round. Translated: the first stitch in that last round.) Be sure to go under both loops with your needle, just as you would if you were crocheting a stitch, and pull the yarn through.


Now it gets a wee bit tricky...well, tricky to explain, at least, but hopefully easy to
understand and do! Put your needle down through the back loop of your last stitch
and pull the needle through, to the inside, until you have that nice little
v-shape that technically isn't a stitch, but looks very much like one!


Pull it until it is the same size as your other stitches, and voila!...you have a nice smooth join at the base of your hat! 


Happy joining!